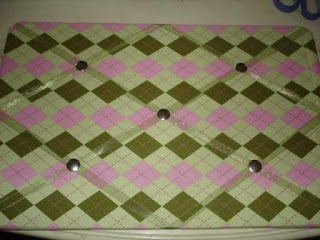
One of my friends had mentioned she wanted a board to put on her desk to display a few pictures but didn’t want to pay the $20+ it cost for some of the pre-made boards she found. I told her that I could make her one, even though I had never done one before. I did not have any instructions and just went based on what I had seen in the stores. I soon realized these were super easy to make, took very little time, and even better cost less than $13 to make (even less if you had many of the supplies already or made multiple ones).
This is what I made! I love it and have since made about 7 others as gifts for friends and family.
What you need:
- 11x17 Cork board (no trim) $4.99 at Hobby Lobby. (You can go bigger if you want)
- ¼ - ½ a yard of your favorite fabric. I paid $1.45 at Hobby Lobby
- A regular roll of matching ribbon about a 1/2” or so wide depending on your preference. $0.99 at Hobby Lobby
- A large staple gun and staples. Already had. (If you do not have a staple gun you can try a hot glue gun)
- 1 can of spray adhesive. We had this but it is $2.99 at H.L. (Note: You don’t have to use this, but I like it because it gives a little extra support and helps keep the fabric from wrinkling or bunching up. Plus the spray will last awhile if you do more of these.)
- 1 box of Extra large thumb tacks. I paid $1.99 for 65. But you only need 5 per project so if you do multiple ones these will last you for a long time.
- 1 pair of scissors.
Start up cost for the first one: $12.41. Each additional board: $7.43 ...seriously what a deal! These are about $20-$30 in the stores.
How to:
Start with your cork board. Measure & cut out the amount of fabric you need, leaving a couple inches extra on each side to fold over.
Go outside and lightly spray the top of the cork board and the back of your fabric and stick together, smoothing and pressing down for a minute or so. (make sure you have something to cover your face or stay away from the adhesive fumes, I didn’t do that the first time…oops! And keep away from pets - see picture below! Belle always wants to help.)
Pull tightly and cover the fabric on the board, making sure to smooth out any bunched up material on the front. Fold over the extra material on the back and spray a little adhesive to make sure it sticks.
Using your staple gun, make sure the material is securely stapled all the way around on the back. I may have went a little crazy with the stapling, but I wanted to make sure it was secure!
Your board should now look like this and be secure.
Now take the ribbon (Don’t cut the ribbon until you measure first) and starting at the top left go to the bottom right. Staple the ribbon on the back. Now take another piece of ribbon and go from the top right to the bottom left and staple on the back. You should have a giant X.
Take some ribbon and start in the center left and go to the center top (follow green X's and trace the blue lines). Staple. Then center top to center right. Staple. Center right to center bottom. Staple. And finally center bottom to center left. And staple. It should look like the picture. (Basically a giant X with a Giant diamond on the inside.....sorry if it doesn't make since, but do you like my amazing paint shop work!)
Take your extra large tacks and place in the center of where the ribbon meets on the board.
And you are done. BEAUTIFUL!
These are a couple others I made.


THESE ARE AWESOME! I absolutely LOVE this idea. I am totally buying fabric when we get back in town, then I'm going to come back to this post and follow the steps. SO AWESOME, W.K.!!!
ReplyDeleteThese are SO CUTE! Way to go, WK! :) What a great gift idea, too. Thanks for sharing! (I absolutely love the blue and brown ones.)
ReplyDelete(I'm so glad I'm not the only one with craft ADD. I have an entire closet dedicated to abandoned craft projects. I keep telling myself that when I retire, I'll dig it all out. Only 23 more years to go...)
Those are AWESOME! And what a great tutorial - you go girl!
ReplyDeleteLove Love Love the last one! These are great! I will def be making some for friends and family!!
ReplyDeleteP.S.... thanks for the step by step, that is how I need to see things get done!