Showing posts with label Crafts. Show all posts

Saturday, December 01, 2012

Talk To Me - Calling All Crafty and Creative People! HELP!

So we never really decorated Henry's room.  We have items in his room and went with an animal theme for lots of his stuff, but as for decor or a theme nothing was ever done.  Basically, his room is SO basic!  Nothing on the plain white walls (no, didn't even paint as my sister was living there when he was born) and no real decor.

Since he turned one I have wanted to do something with his room that is more permanent and for him.  I am going with the space/alien theme!  I think we are going to get him a solar system thing that lights up on the wall and we already have stars that we can turn on to light the wall.  However, I want to do some fun things decor wise....and that is where I need you!

I have some vague ideas and am usually pretty creative but honestly between work, home, and just having a brain that feels like mush all the time I just haven't done anything the past few months.  I have had a major creative block!

And as SO many of you are very creative, I thought it never hurt to ask you all to help inspire me so I can have his room done before he leaves for college ;-)

So here is what I have so far.....


* Chalkboard - though I am thinking of taking this back and getting chalkboard paint for a small part of the wall.  Thoughts on chalkboard paint? Thought on a chalkboard in his room?

* Wooden letters of his name that I want to paint in some fun way w/ little wooden space items.  I am not sure how to incorporate these into his room.  Do I hang his name and put those around.  Maybe put the letters in frames with fabric behind.  Maybe put velcro on the back of the space items and make a backdrop that they can stick too?  Make some kind of picture with them of the solar system?!

* Space fabric.  Two different kinds of cotton fabric (on the left).  One is of planets the other of alien robots.  Not sure what to do with these either.  Pillows? use as a backdrop for something?

* Also have alien scrapbook paper (below)


I also thought based on a picture Sassytimes put up where she used felt for a Christmas thing, that I could use felt and make plants that he could move around.

I can draw a bit and paint so I would and could do something that involved that as well.

We want to paint his room a blueish grey, but honestly not sure if or when that will be done based on our schedules.

ANY THOUGHTS/IDEAS?!?!?!  

They would be greatly appreciated :)


Thursday, February 02, 2012

Check Out My Friend’s New Business!!! Crocheted hats = ADORABLE!


So a friend of mine who is a stay at home mother of three gorgeous girls just started a business in the last few months and I hope you will check out her site because she does amazing work. 

She crochets hats for little kids and these hats are AWESOME. (How she has time do this while taking care of a 5 year old, 3 year old and 1 year old is beyond me...but she does and these hats are fantastic!)

This is the hat she made for Henry and I LOVE IT and so does Henry. (I need to take a better photo of Henry in the hat for her FB page....you know since Henry will be the next Gerber Baby and all.)


Seriously. ADORABLE. (And I am not just talking about my kid!)

Here are some other hats:


STOP IT. These zebra hats are fantastic.

Strawberry Shortcake hat as modeled by one of her adorable daughters!


Come on...so cute.


See – AWESOME!


Henry is getting this one for his first birthday.


You can visit her ETSY shop HERE or go to her Facebook page HERE.  


She has a give-a-way on Facebook that she is doing very soon so check her out now! Her shop is called Chalooby Baby Boutique.

 She will work on you with sizes and colors. And if you have a pattern for her but no time to make it or are looking for something that she doesn’t have in her store, please email me (wrestlingkitties@hotmail.com) and I can check with her and see if she can do a custom order. I know she is looking to grow her product line, which will include both boy and girl items!!

 SO CHECK HER OUT!!


Update - Her give-a-way ends today....hurry to her facebook page and comment on her give-a-way picture!

Tuesday, September 14, 2010

I am ALL About the Give-A-Ways!!!

So we all know our great friend Wendy over at A Couple More Hours, right?! You are missing out BIG time if you don’t, I'm just say'n. Well she is a very talented and crafty person and she happens to be having a fun give-a-way over at her blog that I very much want to win!!


You can gain entry into the give-a-way by visiting her blog HERE.

Ooooooops, did I send you to the wrong site, my bad…..I would never  try to detour any of you from registering for this give-a-way to increase my chances of winning. That would just be evil and we all know I am anything but evil! Mwah ahahahaha.

Now, I think there are multiple ways to enter, but you don’t need to worry yourself with those details. All you need to do is stay away from go over to her blog (there is a link somewhere on my blog) and comment ONE time on her post. But just once, I don’t think she wants her comments section all filled up with your remarks….so please be mindful of that.

I really want to win and am sharing this with you all because I want 3 more entries she is a good friend who is crazy talented and I want people to see the cool stuff she makes before it ends up at my house.

So visit this crafty chica’s blog in 2 days or so! Oh, and if you want, feel free to leave your entry comment here on MY blog and I will make sure that W. gets them before 8pm on Friday. What, it is over Wednesday….oh that is my bad again.


Seriously though....GO TO HER WEBSITE!  She rocks.

Sunday, June 06, 2010

Gettin Crafty With It

So awhile back I decided I wanted to try some new craft projects. I have a bit of craft ADD and love to try new projects, even if I am not done with the 16 other projects I have started.


One of my friends had mentioned she wanted a board to put on her desk to display a few pictures but didn’t want to pay the $20+ it cost for some of the pre-made boards she found. I told her that I could make her one, even though I had never done one before. I did not have any instructions and just went based on what I had seen in the stores. I soon realized these were super easy to make, took very little time, and even better cost less than $13 to make (even less if you had many of the supplies already or made multiple ones).

This is what I made! I love it and have since made about 7 others as gifts for friends and family.


So I thought I would share how you can make them too. (or maybe I will start selling them....hehe!)

What you need:


- 11x17 Cork board (no trim) $4.99 at Hobby Lobby. (You can go bigger if you want)

- ¼ - ½ a yard of your favorite fabric. I paid $1.45 at Hobby Lobby

- A regular roll of matching ribbon about a 1/2” or so wide depending on your preference. $0.99 at Hobby Lobby

- A large staple gun and staples. Already had. (If you do not have a staple gun you can try a hot glue gun)

- 1 can of spray adhesive. We had this but it is $2.99 at H.L. (Note: You don’t have to use this, but I like it because it gives a little extra support and helps keep the fabric from wrinkling or bunching up. Plus the spray will last awhile if you do more of these.)

- 1 box of Extra large thumb tacks. I paid $1.99 for 65. But you only need 5 per project so if you do multiple ones these will last you for a long time.

- 1 pair of scissors.

Start up cost for the first one: $12.41. Each additional board: $7.43 ...seriously what a deal!  These are about $20-$30 in the stores.


How to:


Start with your cork board. Measure & cut out the amount of fabric you need, leaving a couple inches extra on each side to fold over.

Go outside and lightly spray the top of the cork board and the back of your fabric and stick together, smoothing and pressing down for a minute or so. (make sure you have something to cover your face or stay away from the adhesive fumes, I didn’t do that the first time…oops!  And keep away from pets - see picture below! Belle always wants to help.)


Pull tightly and cover the fabric on the board, making sure to smooth out any bunched up material on the front. Fold over the extra material on the back and spray a little adhesive to make sure it sticks.


Using your staple gun, make sure the material is securely stapled all the way around on the back. I may have went a little crazy with the stapling, but I wanted to make sure it was secure!


Your board should now look like this and be secure.


Now take the ribbon (Don’t cut the ribbon until you measure first) and starting at the top left go to the bottom right. Staple the ribbon on the back. Now take another piece of ribbon and go from the top right to the bottom left and staple on the back. You should have a giant X.


Take some ribbon and start in the center left and go to the center top (follow green X's and trace the blue lines). Staple. Then center top to center right. Staple. Center right to center bottom. Staple. And finally center bottom to center left. And staple. It should look like the picture. (Basically a giant X with a Giant diamond on the inside.....sorry if it doesn't make since, but do you like my amazing paint shop work!)


Close up of the ribbon.


Take your extra large tacks and place in the center of where the ribbon meets on the board.


Like this.


And you are done. BEAUTIFUL!


These are a couple others I made.


So there you go!  Hang on a wall or put on your desk with a few of your favorite pictures. Ok, so have fun if you want to make these!  Or, if you want me to make you one I would love too!!!

Thursday, November 19, 2009

I Love……Crochet Edition

I love crocheting.

Yep, I find it very relaxing. Well, except when I mess up....or when I have to take apart something I have been working on for hours....or when I can't figure out a stitch....or when a finished product looks like shit. But other than that it is very therapeutic! It is fun starting with a ball of yarn and some time later having something that (in most cases) is actually wearable.

So a couple months ago I got the genius idea to crochet gifts for all my family members (and myself) for Christmas. I had an ambitious list of about 12-15 items I WANTED to crochet for people (and myself) by Christmas time. I find myself still crocheting and attempting to make as many things on my list before Christmas that I can and I am just over half way there! And yes I know that Christmas is just over a month away. And that it takes me about a week per project. And I have at least 6-8 projects left to complete. But I think I have plenty of time to get everything done. (Good thing I am not great at math)

When I tell people I crochet, many say that they want to learn but do not know where to start. So for this post I thought I would show a few of my favorite crochet must have items that will help you get started crocheting, as well as, a few of the things I have completed. Yes, I am showing off a bit.

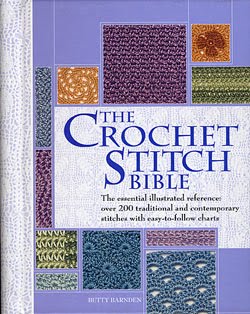
1) I just got this book and I truly believe that it is a MUST HAVE for anyone who wants to crochet or learn how to crochet. It was on sale at Amazon for $20. It is called the Crochet Stitch Bible. It is not very big at all, about the size of a day planner. It has tons of beautiful pictures with detailed descriptions on how to do each stitch and it has nearly every stitch pattern you could ever want to learn and pictures of what the completed stitches actually look like. The book could be used by beginners or hardcore crochet-ers and everyone in between. (seriously, this book is so pretty to look at and very helpful, I love it – yes, I am a geek)


2) An 8 Pack of Wrights Boye crochet Aluminum Hook set -Sizes D-K. I prefer the aluminum crochet hooks and it is a lot cheaper to buy them in a pack like this than individually. A pack like this costs anywhere from $9-$13 and it will pretty much have every hook you will ever need. Plus I find they just fit well in your hands.


3) This is not actually necessary but I love it, especially the color. A Yarn Cutter Pendant. Scissors also work very well, but I just think this is really cool looking and it is under $10. I think there has to be some importance in having this, and that is why I have one.


4) Good yarn. Lions Brand is one of my favorites to work with. Go to their website for free patterns.

As for what I have made….

This is K. wearing the hat I made her. She was suppose to wait for Christmas, but she loved it so much I let her have it early. Her hat is the same pattern as mine which you can see in more detail below.


The back of the hat.


And the front.


This is a shawl/scarf I made for my Nana. (folded in the picture, but it is pretty large).


It is a shell pattern. Very pretty but took forever.


For my MIL.


My scarf


For my Grandma.


I love this pattern.


I have a couple more completed, but some family members read this blog and I need to keep theirs a secret :) But I do have a few more scarves, some gloves, some little kiddie hats and scarves to finish then I am done....for now!

In case you were wondering why over the past few months my blogging has been a little less frequent, it is because this is how I spend many an evening after work.

Friday, March 07, 2008

A Great & Cool Craft Project!


I think I am in the mood to shop today! hehe

I think these vintage record bowls are SO fantastic! T&I love records and have a few record players. I am very into vintage things and just think these are WAY cool! And I am always up for a fun new craft project!

T & I have been searching for some cheap records so that I can make a bunch of these bowls. I have a few records; I would have more however my husband (the anal record collector he is) only wants me to use certain types of records to make these bowls, says some just won't work right. Whatev!

Here is how you can make these (like the pic above) however, if you just want to buy them done and perfect (bottom pic - $26) click here!!

1. Get some cheap and useless vinyl records. (Unless you are married to my husband)
2. Preheat your oven to around 200 degrees Fahrenheit.
3. Place your record on the center of an upside down pot or metal bowl. Put this onto a baking sheet.
4. Put this into the oven. Keep a close watch because each vinyl starts to "flop" at a different time. It usually takes 4-8 minutes.
5. Take the whole thing out of the oven (wearing oven mitts, of course) once you notice some real "flopping" going on.
6. Put your record into another bowl and shape it around that, or you can hand mold it. Sometimes, you might like the way it looks right as you take it out of the oven; if so, skip the molding.
7. Let it cool for 10-15 minutes.
8. Flip it over.
9. Put your bowl to use!